The front sights can be an unnecessary item, even becoming entangled. Some shooters choose to disassemble them, but it is quite time-consuming with this operation.
So, how to remove the Ar15 A2 front sight? In this article, I give you some easy tips below to quickly reach and follow.
What is Ar15 A2 Front Sight?
The AR-15 A2 front sight is a component found on the front end of an AR-15 rifle. It is a fixed, non-adjustable sight that is typically included on traditional AR-15 models. The A2 front sight serves as a primary sighting system for the rifle, providing a reference point for aiming and accuracy.
The A2 front sight consists of several parts. The sight base, which is attached to the barrel, holds the front sight post and protective ears. The front sight post is a vertically adjustable post that can be raised or lowered to align with the target. It is typically a square or round post that can be adjusted using a tool or the tip of a bullet.
The protective ears on either side of the front sight post shield it from damage and provide additional stability. These ears also feature protective wings on top to help guard against glare or unwanted light interference.
The AR-15 A2 front sight is designed to be rugged and durable, capable of withstanding the demands of shooting and handling. It is commonly made from steel or other sturdy materials to ensure stability and longevity.
While the A2 front sight is a reliable sighting system, it does not offer windage adjustments, meaning it cannot be adjusted for left or right aiming corrections. Instead, windage adjustments are typically made by adjusting the rear sight or utilizing other sighting accessories.
The A2 front sight is a popular choice among AR-15 enthusiasts and military-style rifle enthusiasts who prefer a traditional and dependable sighting system. It is a standard feature on many AR-15 rifles, offering simplicity, durability, and reliability in a compact design.
Required Tools and Materials for Remove Ar15 A2 Front Sight
To remove the AR-15 A2 front sight, you will need the following tools and materials:
- Punch Set: A set of various-sized punches will be needed to drive out the taper pins that secure the front sight assembly.
- Hammer: A hammer is required to tap the punches and apply controlled force for removing the taper pins.
- Vice Block or Gun Vise: A vice block or a suitable gun vise will help secure the upper receiver of the AR-15 during the front sight removal process.
- Penetrating Oil (Optional): In case the taper pins are stubborn and difficult to remove, applying a penetrating oil to the pins can help loosen them.
- Cleaning Supplies: Cleaning supplies such as solvent, lubricant, and cleaning patches may be needed to clean the barrel area and components after the front sight is removed.
It’s important to note that the specific tools and materials required may vary slightly depending on the manufacturer and model of your AR-15, as well as personal preferences. Always consult the manufacturer’s instructions and ensure you have the necessary tools to safely and effectively remove the front sight assembly.
How To Remove Ar15 A2 Front Sight?
Removing or replacing the point of view is not a complex process, but it also needs to ensure safety. There is no need to bring in professionals; follow these steps to make the process easy.
Get The AR Rifle Out
Before removing the binoculars, it is necessary to remove the handguard.
Using the “hook” of the handguard, then slide the arm in the triangle direction on the top of the gun.
Now pull the guard arms of the tool back. The spring compresses and creates space, allowing half of the arm guards to move outward.
Clamp Up AR-15 Rifle
Keep the top half of the Ar 15 rifle away through a thin visor. We understand that the primary purpose is to remove the lights, also known as the red dot.
Flash frames are often attached with cupped washers to create tension and limit the release when firing.
At this location, torque joints are often added for proper alignment. Therefore, manufacturers will design a clamping mechanism to help keep it safe during the removal of the flash-assist flash.
For this process, it is to use the AR-15 SKU # 080-000-659 WB action visual block set to complete the task more efficiently.
It is necessary to completely disassemble the upper half of the Ar15 body from the lower body during use. There are binoculars, handles, and optical lenses.
Next, the mechanic will remove the bolt and the charging handle to replace them with the Ar15’s action bar. You can also replace the inserts from different brands, as long as it fits. It limits damage, helping to protect the lens against impact forces.
Proceed to the stage where the upper receiver is placed on the vise block itself, rocking it so that the receiver fits into place.
Finally, close the action block and clamp the plate on the bench plate.
Remove Flash Hide
Use Brownells AR15 armorer’s dedicated wrench to remove the flash. You need to use muscular force at this stage and fix the rotation to open the twist on the gun bar.
Get the Gas Tube out
Before I move on to phase 4, I have to tell you a few things to keep in mind:
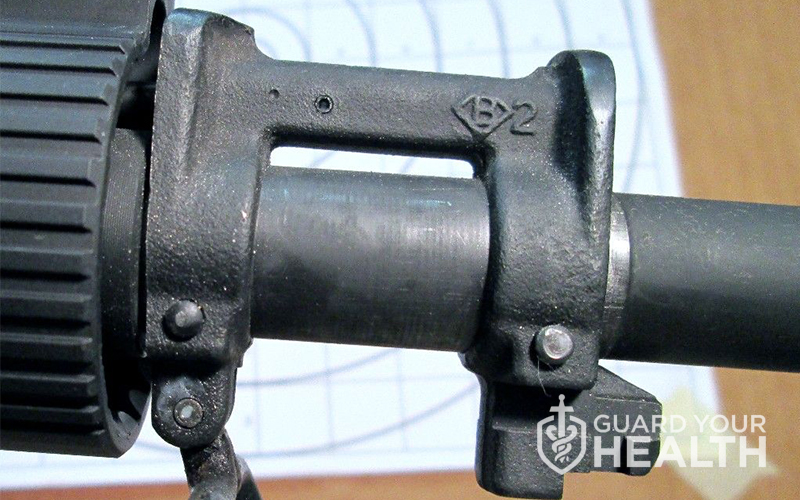
Firstly, be sure to place the gun in a fixed position; attachments such as clamp number 2 SKU #230 -100-002WB will need to be up to standard.
Using the wrong clamp pin can cause the roll deformation phenomenon. Not that you will think about how to replace the new one. But no, the coil stapler is not replaceable.
The roll latch keeps the air hose reel in the best condition, and it can be pretty confusing for the uninitiated. Now, read on if you want to get to grips with this.
Second, prepare a copper or plastic hammer to be ready to use force in the following steps. Professionals often prioritize the use of bronze hammers in all decisions. We have learned the answer from quite a few artisans.
They believe that steel is quite dangerous between the use of steel and copper hammers. Both objects may explode and be thrown away when applied with a large force, endangering nearby objects, all derived from Murphy’s law. Therefore, the copper hammer is the preferred choice for everyone.
Finally, pay attention to the straight clutch while removing the viewfinder. Older firing pins are usually installed in one direction. Be careful while removing the barrel; keep a severe eye on the front sight bench block.
There are two buttons with different names: “Pins out” and “Pins In.”
Here is the process to remove the air tube on the Ar15 gun head:
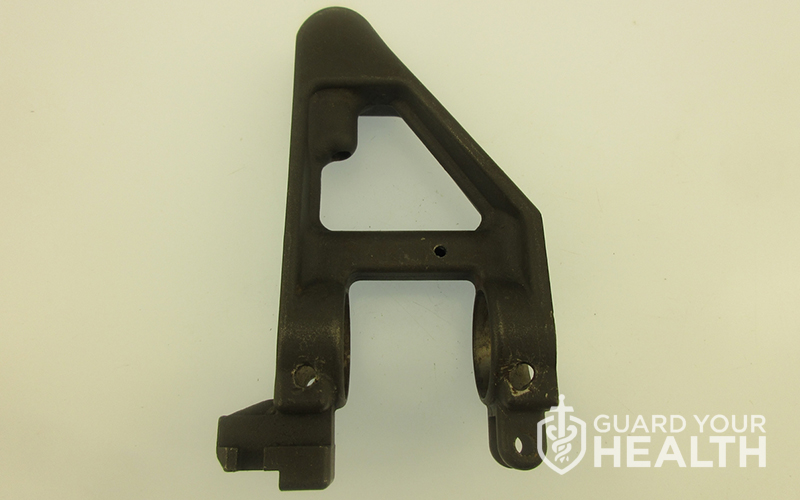
- Step 1: Put down the front sight bench block with the face-up above the words “PINS OUT” and align appropriately to place the gun head in the correct position.
- Step 2: Place coil pin #2 (SKU #230 -100-002WB) into the air tube, making sure the pin end with the small end is firmly seated inside the coil pin hollow.
- Step 3: Use a solid force to press down on the plug; we will see that the inner coil latch will come out. Out of the fixture, when you touch it, you will see that the position of the air tube has loosened. You can already pull it out of the Ar15 sighting pad.
In case the gas hose cannot be removed, carefully screw it off the back of the upper receiver and snap it off. Carbon emissions during firing can be sticky, where you need to pull the scope forward out of the front of the barrel.
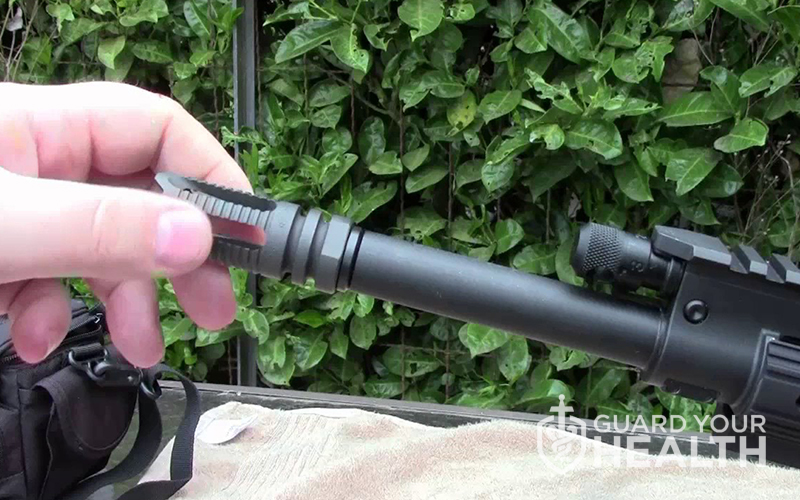
Remove Front sight
The stage has finally come to remove the sight of the Ar15 gun. Still the same procedure as step 4, place the front sight bench block with the PINS OUT surface. Look for a hammer ready to knock the bolts out.
If it is too difficult to remove, use the rubber mallet to move the head of the sight outward. Generating power is an essential factor; the punching force descends vertically.
You can also add a few drops of olive oil or another lubricant to the pins to simplify the removal process.
FAQs
What is the difference between A1 and A2 front sight?
The A1 sight has a round shape. At the wheel of the view, there are five deviation positions. A2 exists under the square aiming, more minor than A1, and has four offset positions on the total rotation. In general, both are suitable for seeking the exact base coordinates.
Regarding the price, you can prefer the A1 version if the budget is not too much. The other will require a higher cost with a commensurate set of durability.
Are all AR-15 gas blocks the same?
The answer is no. Based on Ar15 experiments, gas masses of various sizes exist to accommodate many gas journals in tanks with distinct diameters.
Should I pin my gas block?
It also depends on each case to decide the solution. Reducing the air mass will be fine for most, but if the air mass is in a low profile configuration and is in a free-floating rigid guard. Reducing the air mass is not necessary because it is well against impact.
Do I need an adjustable gas block for a suppressor?
It won’t be obvious to give you an exact answer. There may and may not be.
The same old solution depends on the need to use the gun. In the case of not using the weapon, you can still overuse it when the source of the hp shot exceeds the standard level of the suppressor.
Conclusion
As you know, removing a sight tube from the gun’s head is not very difficult.
Don’t give up when you can’t master it the first time. Learning and gaining experience is the most necessary thing at this time.
We hope that this article on how to remove Ar15 A2 front sight will be of great help to those who are interested. If you have any questions, please leave a comment, and the staff will answer you as soon as possible.
Thank you for reading!
Last Updated on October 28, 2023 by